You're about to actually program a robot 🤖
Take a deep breath — this is easier than it sounds, and we'll go one little step at a time. Nobody is expected to "just know" this. We're going to install one free program on your computer, plug the car in, send the car's program over the cable, and then make it yours by changing a single number. If anything goes sideways, that's totally normal — there's a whole "If something's not working" section near the bottom, and a teacher nearby. You can't break anything by trying. 💪
Here's the magic moment we're heading toward: change one number → upload → the robot does something new. Once you've done it once, you'll be able to change anything.
What you need
- Your built Smart Robot Car V4 (from Session 2), with a charged battery
- A computer (Windows, Mac, or Chromebook with the right software — Windows is what our pictures show)
- The USB cable with the small Micro-USB end — and it must be a data cable, not a charge-only one (more on that below)
- The kit's code download — the folder of ELEGOO files that came with your car (on the CD, a USB stick, or downloaded from elegoo.com)
So… what is code? 💡
Code is just a list of instructions the robot's brain follows, in order. That's really all it is. Think of a recipe ("crack the egg, then stir, then pour") — the robot reads its instructions top to bottom and does exactly what they say. The car you've been driving already has a program inside it. Today we're going to open that program, send a fresh copy onto the car, and then change one instruction so the car follows your rule instead.
setup part (runs once) and the loop part (runs over and over).
Clip from an ELEGOO Starter-Kit "Install the IDE" lesson — that's a different
kit, but the IDE is exactly the same idea (YouTube, ELEGOO Starter Kit).Let's do it, one step at a time 🪜
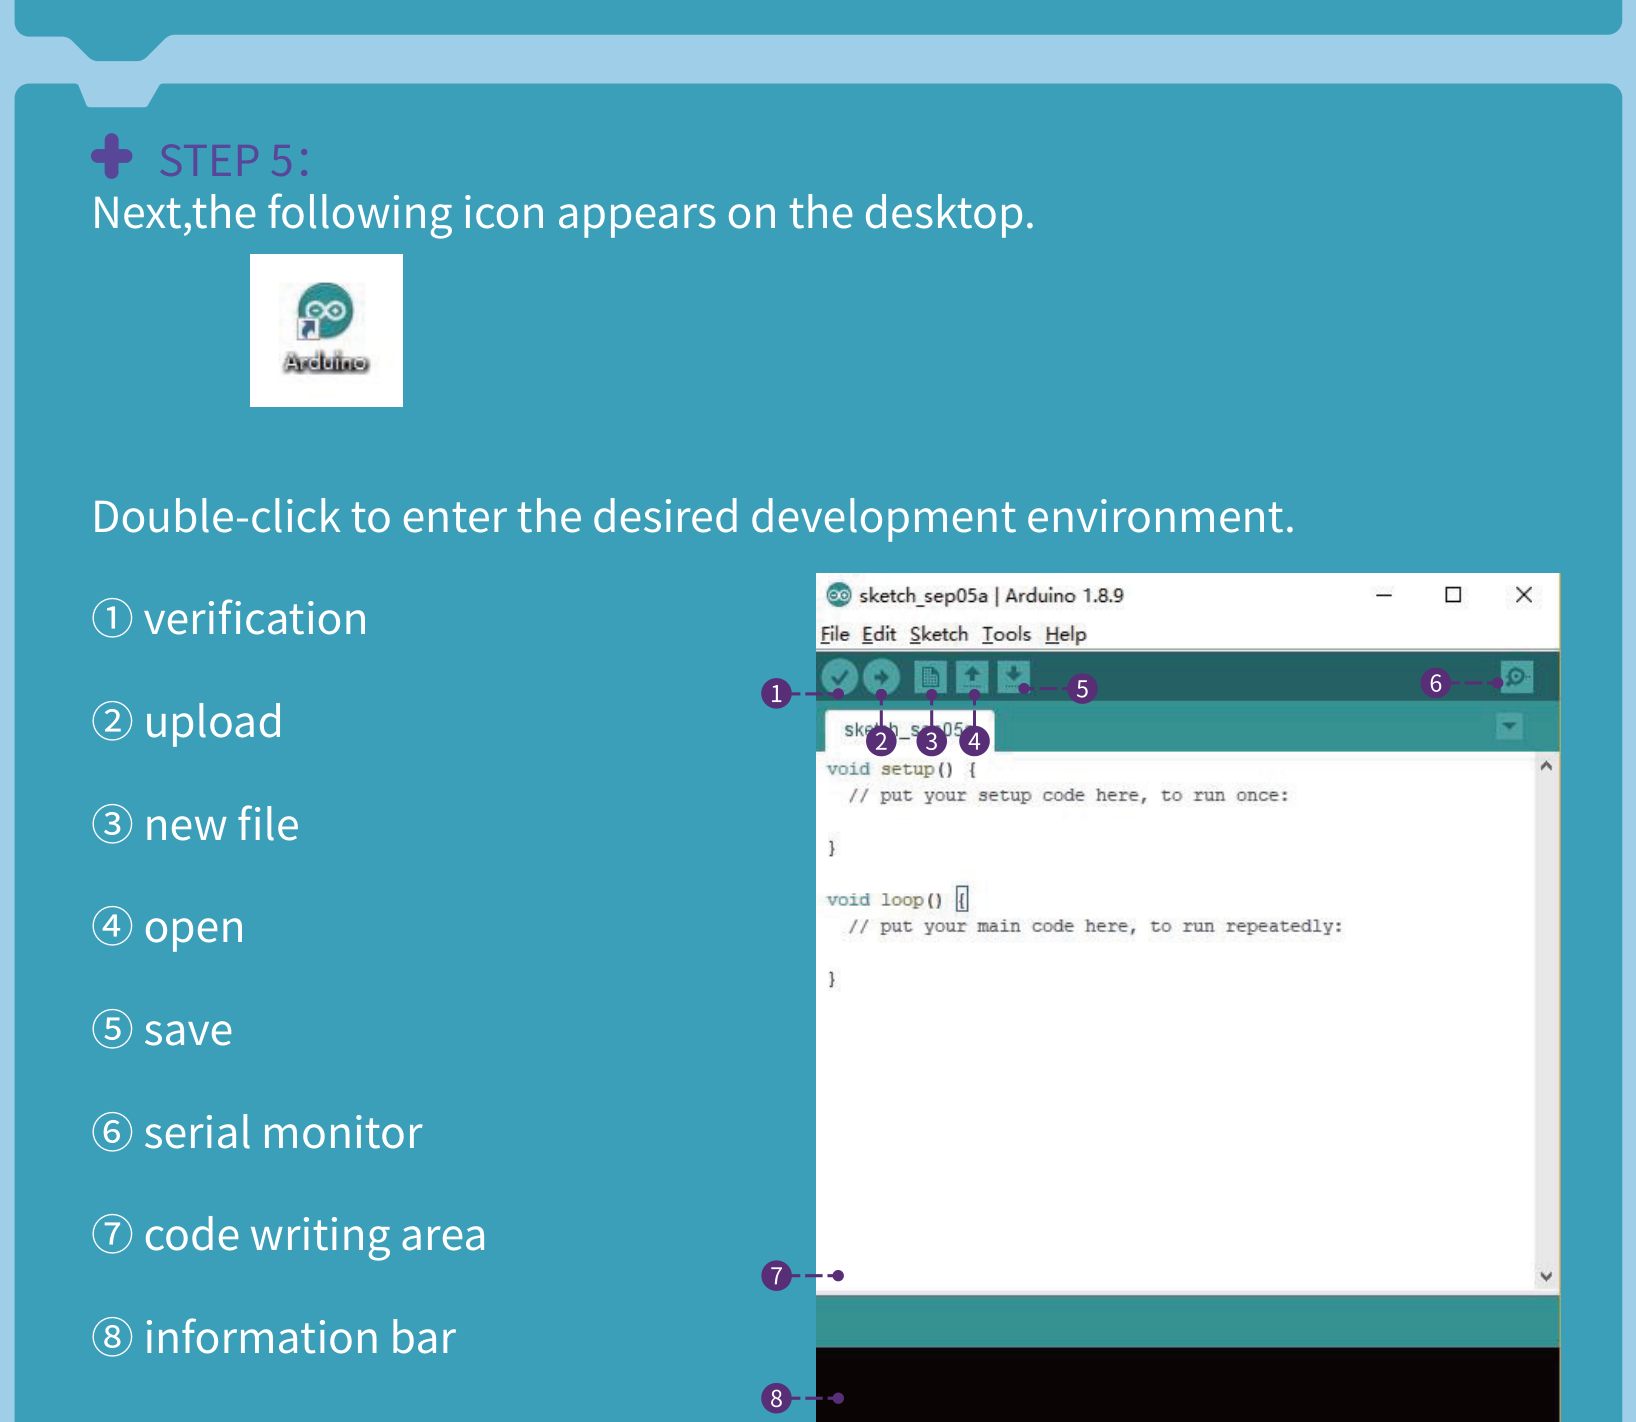
Meet the program: the Arduino IDE
The program we type and send code with is called the Arduino IDE. "IDE" just means "the place where you write and upload code." It's free and made by the Arduino team. When it's open, it looks like this:
Install the Arduino IDE
On your computer, open a web browser and go to
arduino.cc (the official site —
https://www.arduino.cc/en/software). Download the version for your computer
(Windows, Mac, etc.), then open the downloaded file and click through the installer —
"I Agree," "Next," "Install." If a little window pops up asking to install
driver software, say yes / Install — we want that.
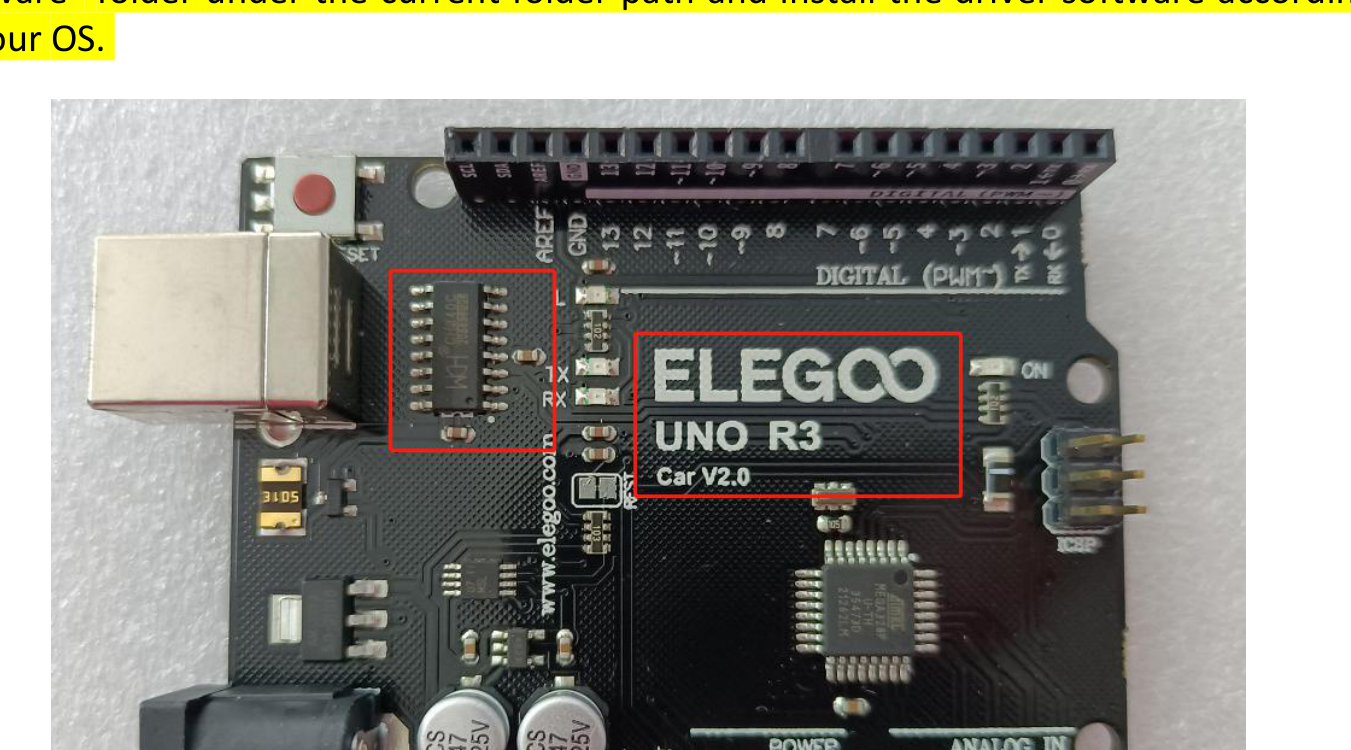
Help the computer "see" the car (the USB driver), then plug it in
Your car's brain talks to the computer through a tiny chip on its board. For the computer to hear it, it sometimes needs a little helper called the CH340 driver. The chip lives right here on the car's UNO board:
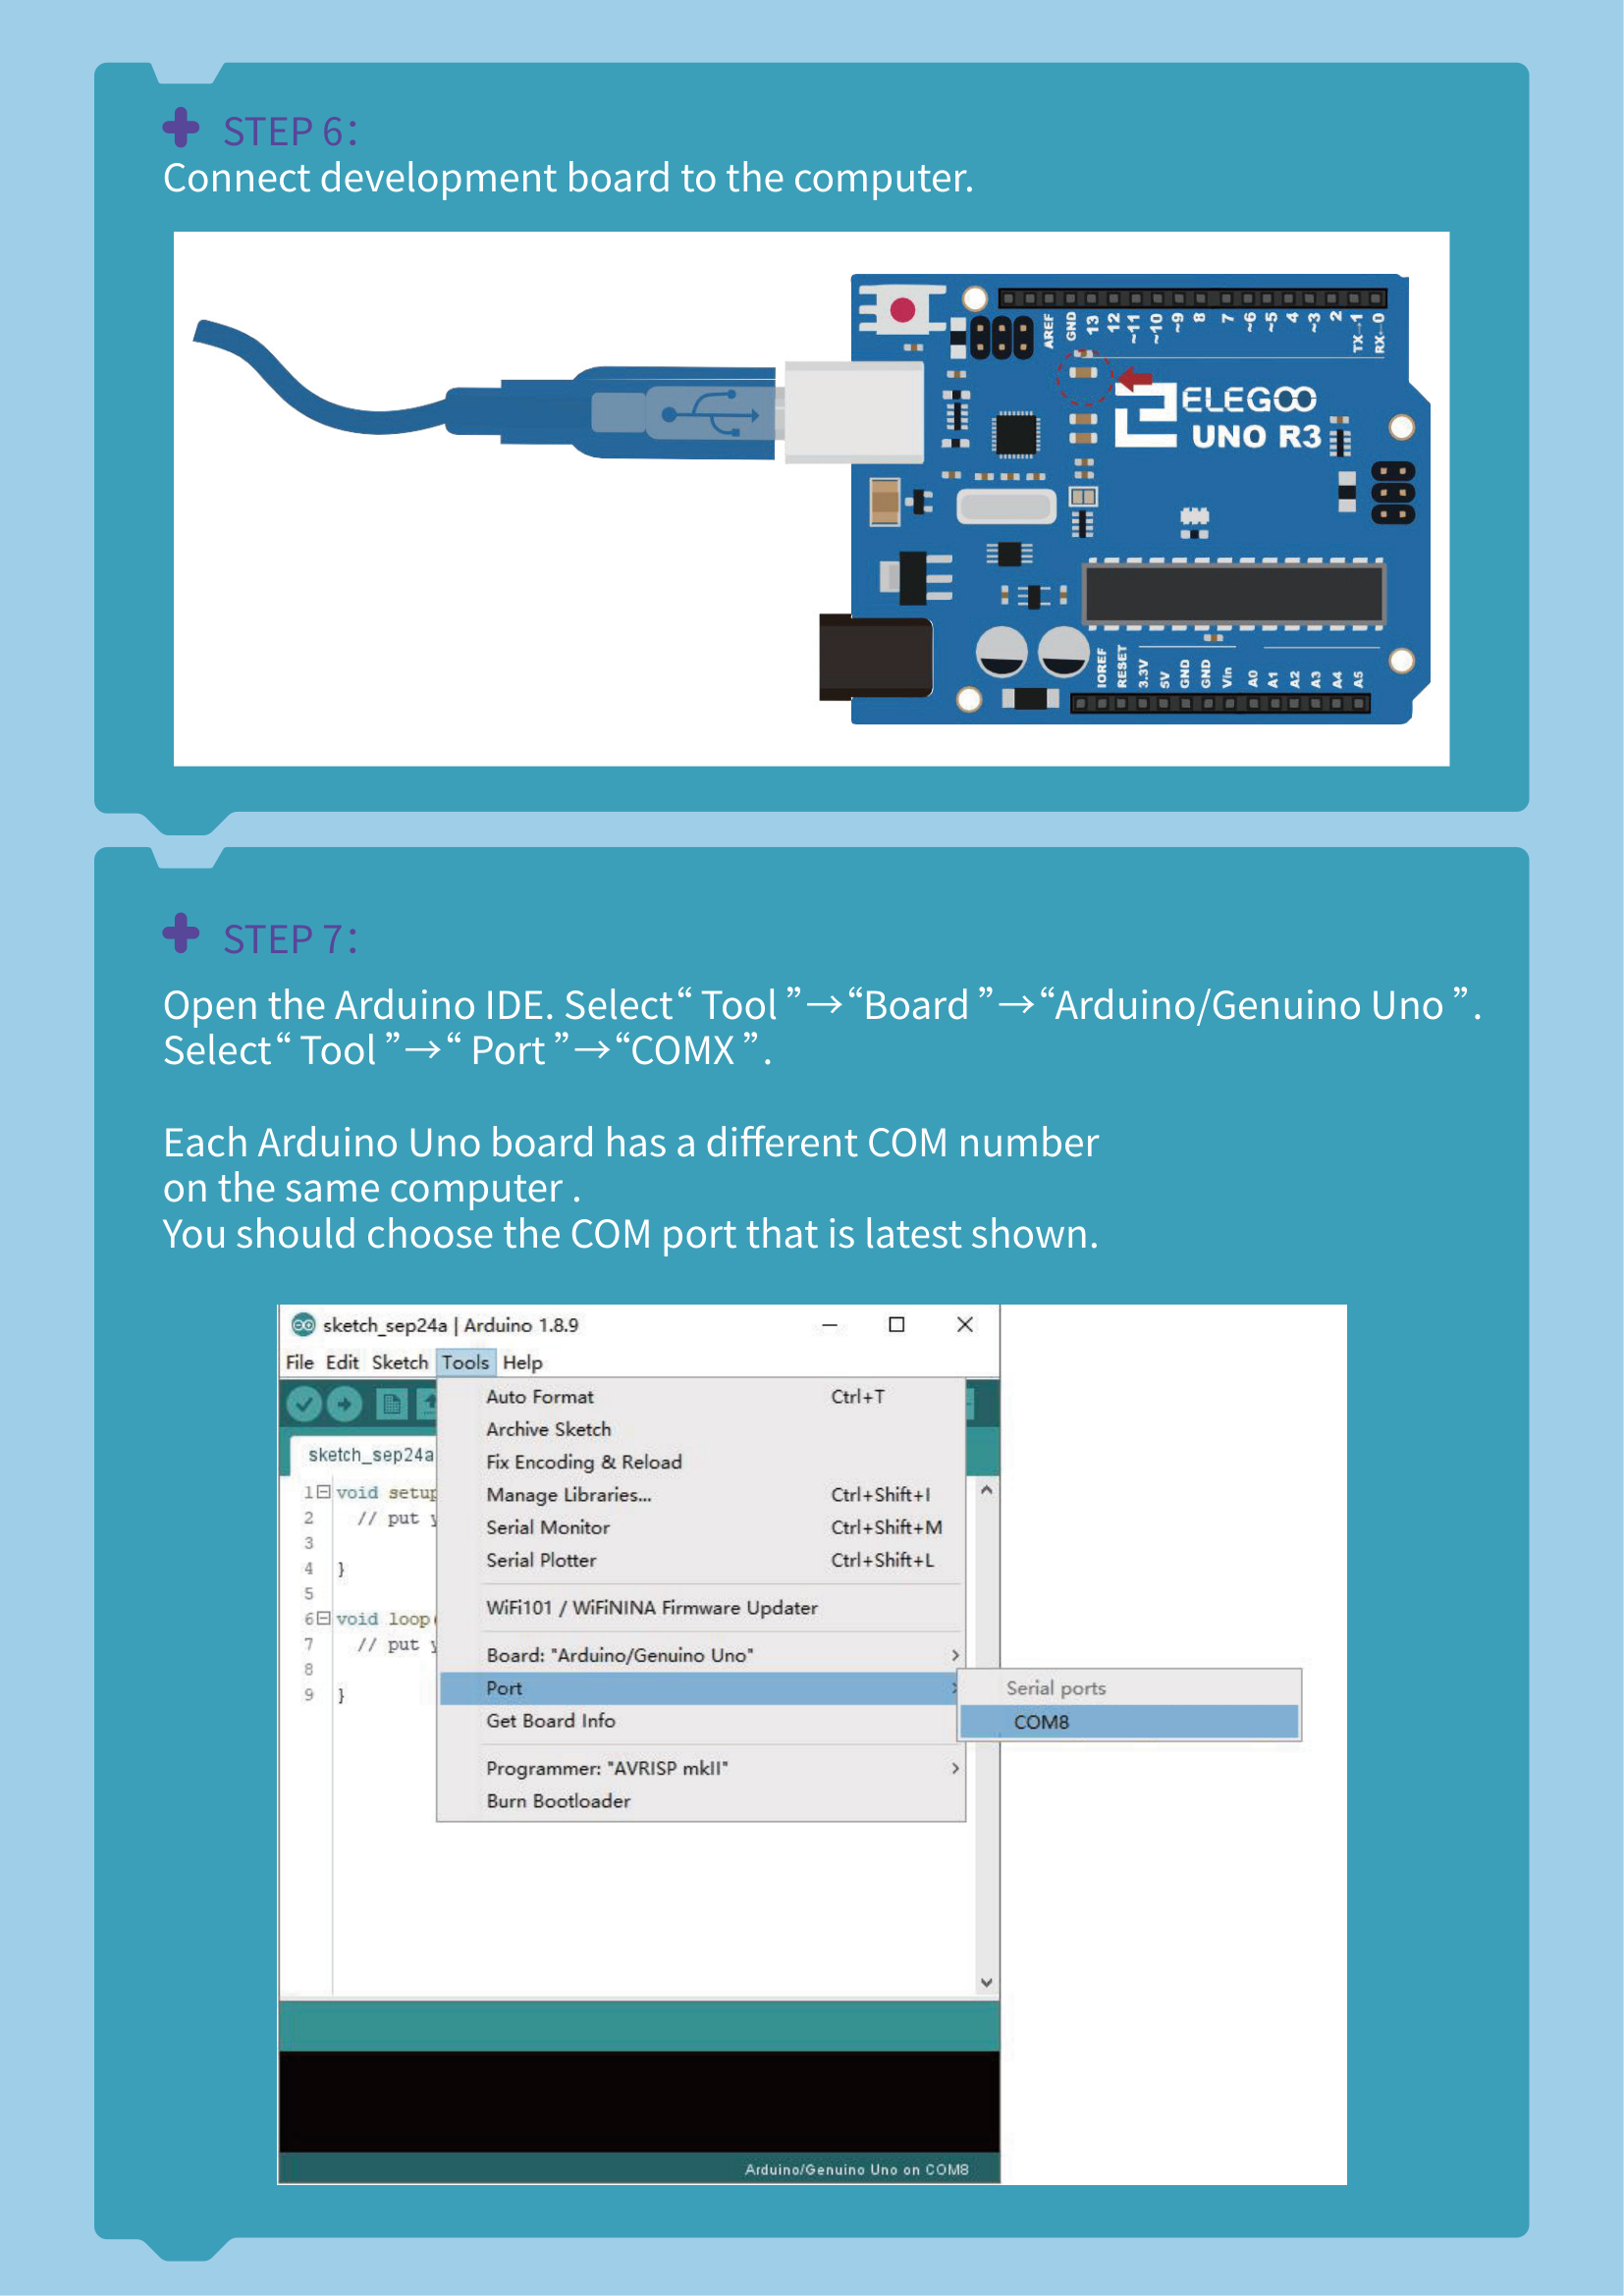
Now grab the USB cable. Plug the small Micro-USB end into the car's board and the big end into your computer. On most newer computers the driver installs all by itself — give it a few seconds.
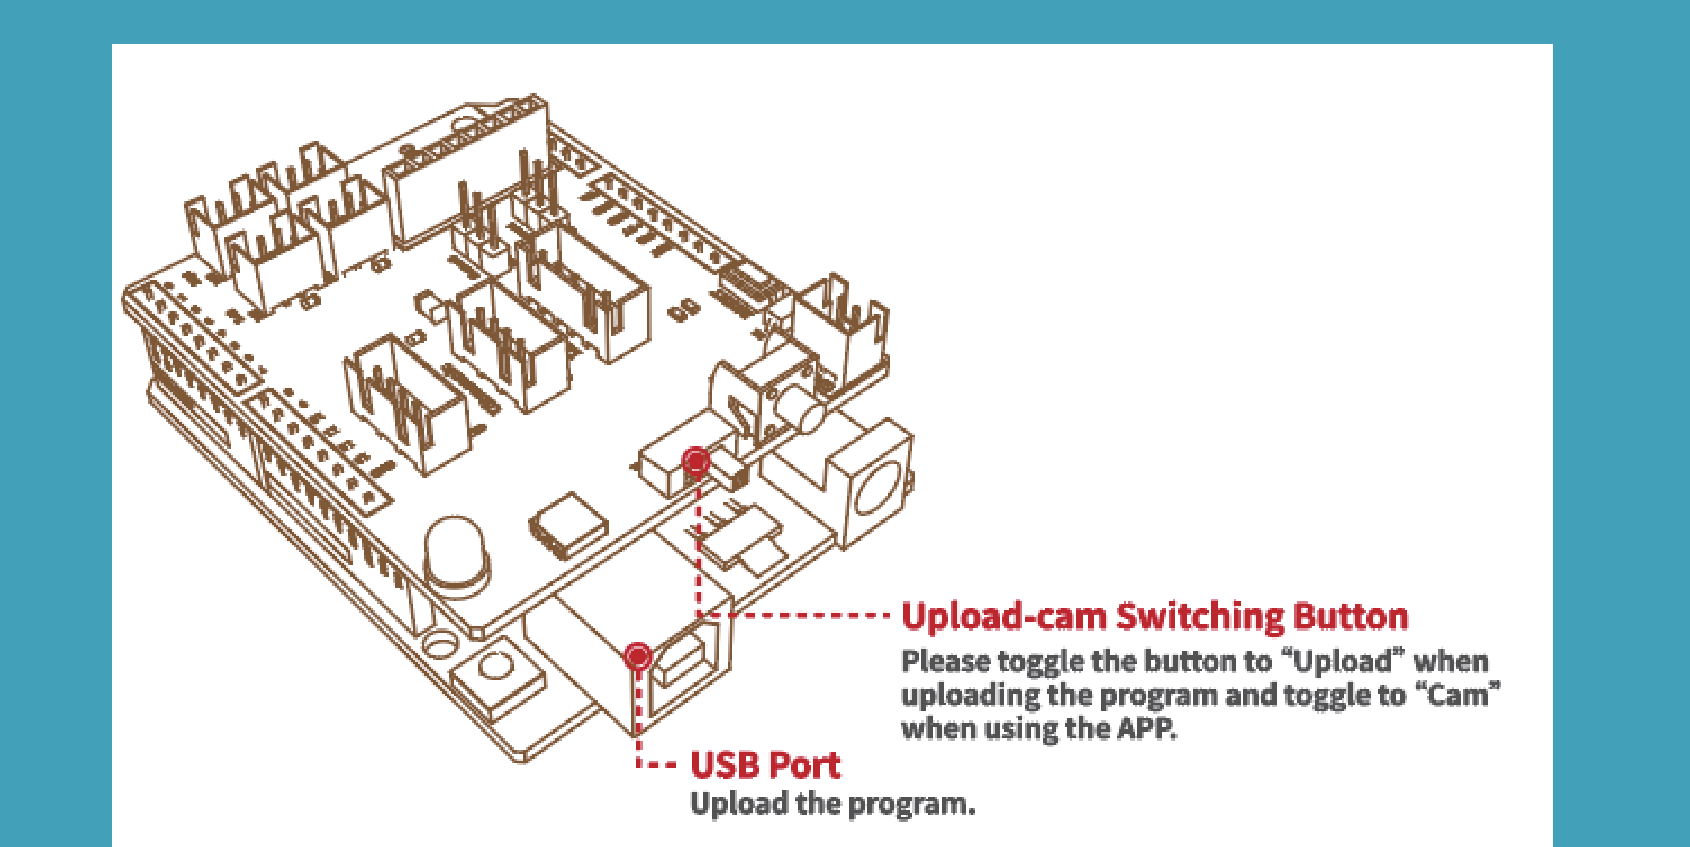
Flip the switch to "Upload," then pick the board and port
This is the #1 most important step of the whole lesson, so go slow. On the car there's a little slide switch with two settings: "Upload" and "Upload-Cam" (sometimes shown as just "Upload" and "Cam"). To send code, it must be on Upload. Find it next to the USB port:
Now, in the Arduino IDE, tell it which robot you're talking to. Open the Tools menu and set two things:
- Board → choose "Arduino UNO" (it may say "Arduino/Genuino Uno" — same thing).
- Port → choose the one that looks like "COM3" /
"COM6" (Windows) or
/dev/cu.usbserial…(Mac). That's your car.
Open the car's program and click Upload
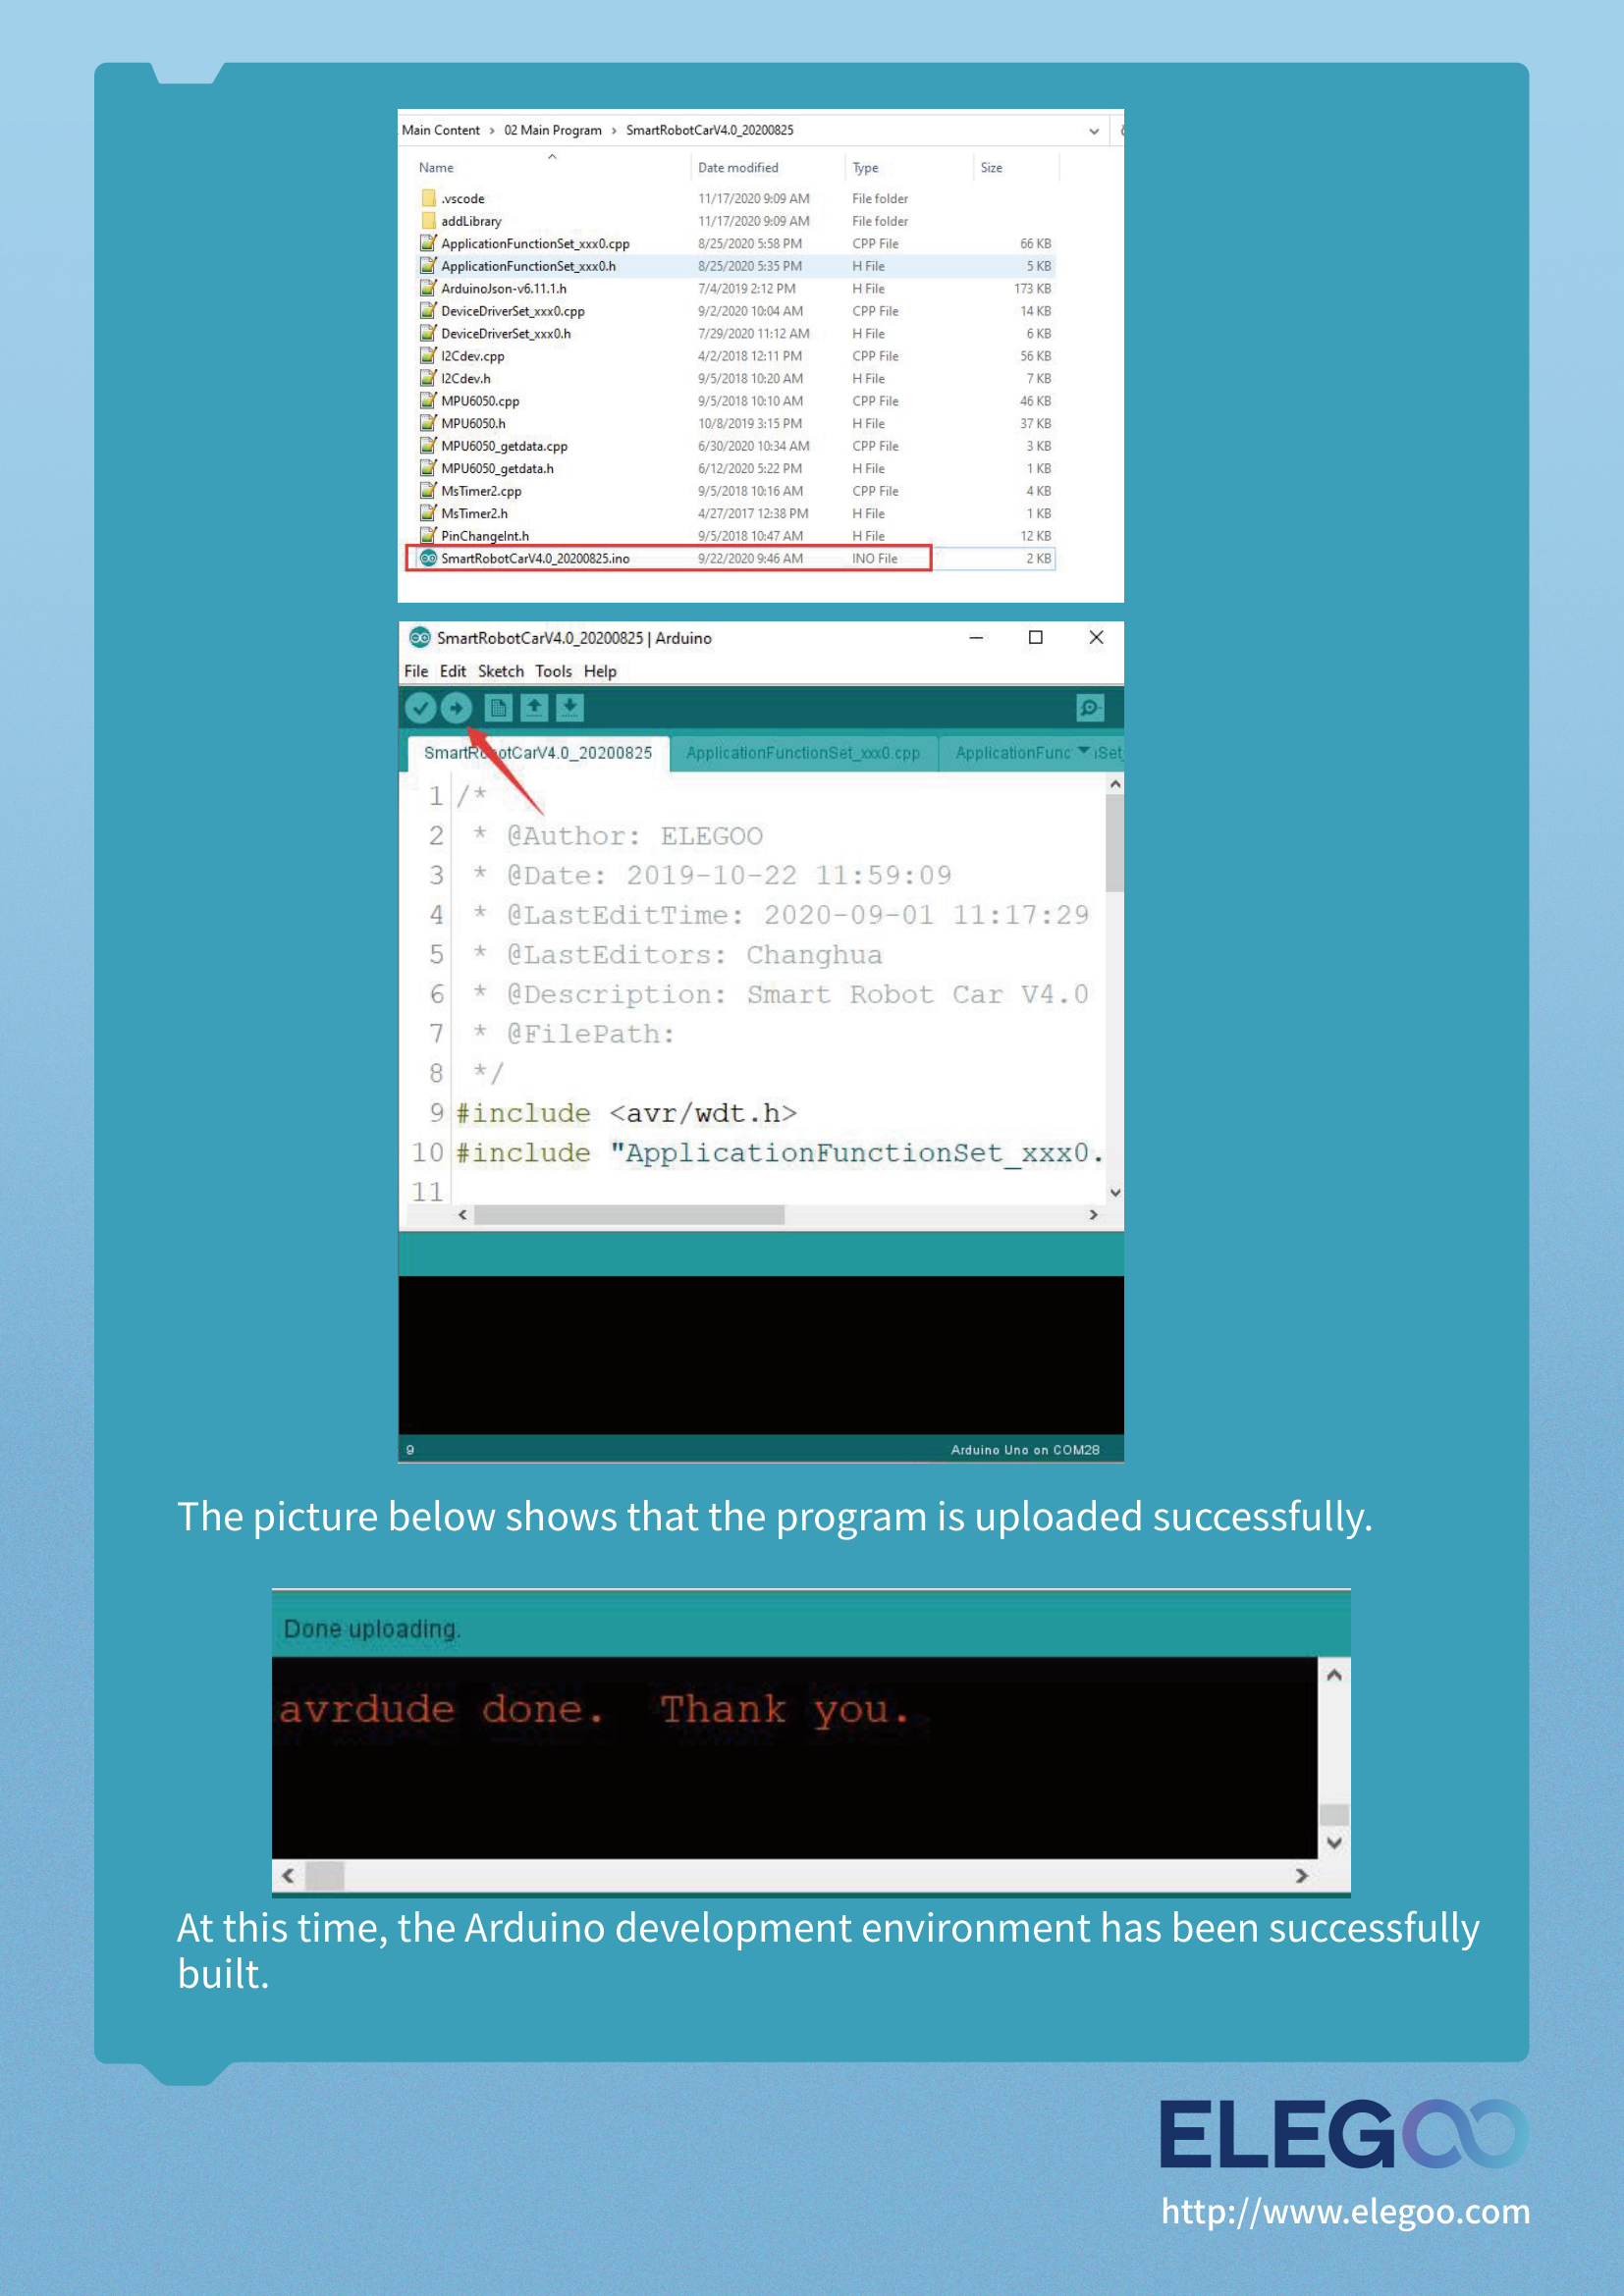
In the kit's code download, find the car's program file. It's named
SmartRobotCarV4.0.ino (an .ino file is an Arduino program).
It usually lives in a folder like "02 Main Program / SmartRobotCarV4.0."
Double-click it to open it in the Arduino IDE.
Now click the Upload button — the round arrow pointing right
at the top. The computer will think for a few seconds (you might see it say "Compiling…"
then "Uploading…"). When you see "Done uploading." at the bottom — and
avrdude done. Thank you. — you did it! 🎉
SmartRobotCarV4.0.ino lives —
if a change ever makes your car act weird, you can re-upload this exact file to put it
back to normal.Make it YOURS: change one number, upload again
Here's the moment. You're going to change a single number in the program, upload again, and watch the car act differently. Pick one of these:
- 🛑 Stop-distance: find a line that sets how close the car lets things
get before it stops or turns away (often a number near words like
distance). Make it bigger so the car keeps more space, or smaller so it gets braver. - 🏎️ Speed: find a motor
speedvalue (Arduino motor speeds go from 0 to 255). Try lowering it so the car cruises slower and is easier to watch.
Change just that one number. Then click Upload (the arrow) again, wait for "Done uploading," set the car on the floor, and switch it on. Did it behave differently? You just programmed a robot! 🚀
SmartRobotCarV4.0.ino from Step 5.If something's not working
"Upload failed" / the bar turned orange or red
Check these in order: (1) Is the car's slide switch on "Upload" (not "Upload-Cam")? This is the most common cause. (2) Is Tools → Board set to Arduino UNO? (3) Is Tools → Port set to your car's COM port? Fix any that are off and click Upload again.
No COM port shows up in the Port menu
The computer can't "see" the car yet. Try, in order: make sure the car is switched on and the cable is pushed in firmly at both ends; try a different USB cable (it must be a data cable, not charge-only); try a different USB slot on the computer. Still nothing? Install the CH340 driver from the kit's code download ("CH340 driver software" folder), then unplug and replug the car.
My car acts weird after I changed something
No problem — this is fixable and totally normal. Just re-upload the original
SmartRobotCarV4.0.ino from Step 5 (switch on "Upload," click the arrow).
That puts the car right back to how it started. Then change just one number again
and watch what that single change does.
I can't find the SmartRobotCarV4.0.ino file
Look inside the kit's code download for a folder named something like "02 Main
Program" or "SmartRobotCarV4.0," and open the file ending in
.ino. If you only have a .zip, unzip it first. A teacher can point
you to the club's copy if your download is missing.
It says "Done uploading" but the car doesn't move
The code is on the car — now check the car itself: is the battery charged and the power switch on? Set it on the floor (not held in the air), and after a change, give it a clear space to do its thing. If you uploaded a slower speed value, it might just be moving gently!
Level up 🚀
You did the hard part — you programmed a real robot, and you saw your change come to life. Here's the best part: now you can change anything. Faster? Slower? Braver around obstacles? More careful? Try one more single-number change and see what happens. Then the big question: what should your robot do next? Dream something up — a new behavior, a trick, a challenge — and bring your idea to the club. That's where we'll head next. 💡